A social media posting schedule is a lifesaver for busy social marketers. How many times have you found yourself scrambling for content at the last minute?
Frantic last-minute posting risks typos, tone problems, and other mistakes. It’s much safer—and more efficient—to dedicate a specific time in your workday to create, tweak, proofread, and schedule posts.
In addition to making your workday less stressful, using a social media scheduler can help you plan an effective content mix. You can look for opportunities to reinforce social messaging across platforms. And, you’ll be able to time your posts to reach the largest possible audience.
In this article we explain how to create a social media schedule. Then, we share an easy-to-customize social media posting schedule template. Finally, we walk you through exactly how to schedule social media posts.
Bonus: Download a free, customizable social media schedule template to easily plan and organize all your posts in advance.
How to create a social media posting schedule in 5 easy steps
1. Conduct a social media audit
Before you can start building your social media posting schedule, you need to have a clear picture of your existing social media accounts. That means you need to start with a social media audit.
Basically, a social media audit is the process of cataloging your existing social media accounts. You’ll also track key information like:
- the social handle for each account
- the goals for the account
- key demographics for the account, derived from analytics
- who is responsible for the account
To keep things simple, you can use our free social media audit template to help you create an up-to-date inventory of all your social accounts.
As part of your audit, make a note of how often you’re currently posting on each social network. Also look at your analytics for any clues about how your posting frequency or time of posting impacts engagement and conversions.
2. Use social listening to understand industry norms
Now that you have a picture of how you’re currently using social media, it’s time to get a sense of what your competitors are up to. Enter social listening.
Using social listening and social media monitoring tools, you can start to understand how other businesses in your industry approach social media scheduling. There’s no guarantee that the social media posting schedule that works for your competitors will work best for you. But this is great source of competitive intelligence to help guide your scheduling strategy.
To start, build a list of relevant businesses and brands in your industry. Then use Hootsuite Streams to monitor their social posting frequency and content mix.
3. Decide how often to post
There is no hard and fast rule about how often you should post on social media. This is one of the reasons it’s so important to understand what other brands in your niche are doing. You can also go one step further by looking at the level of engagement they see on their posts.
In their own best practices for posting to Facebook and Instagram, Facebook says, “Don’t be afraid to post daily.” But they also make the point that “consistent posting is key.”
This is the most important rule: No matter how often you decide to post, be sure to post on a consistent schedule. That said, there’s no value in posting junk content just because it’s Thursday.
Sticking to a regular schedule is important so your followers and fans know what to expect. But if you post sub-par content, your fan base will quickly erode. Scheduling your posts in advance allows you to stick to your posting schedule while also ensuring you have quality content queued up and ready to go.
4. Decide when to post
The great thing about social media scheduling tools is that they allow you to post at the optimal times for your audience, even if those times don’t line up with your core working hours.
The ideal time to post will vary for each business based on the demographics and location of your own specific audience. Keeping a close eye on your analytics can help you understand what is most likely to work for your audience. And testing can help you further understand what times of day work best for your posts.
To get you started, we compiled data from 300 brands to determine the most effective times to post on each social network.
- Facebook: For B2B brands, post Tuesday to Thursday, 9 a.m. to 2 p.m. EST. For B2C brands, post Monday to Wednesday, 12 p.m. EST.
- Twitter: For B2B brands, post Monday or Thursday, 9 a.m. to 4 p.m. EST. For B2C brands, post Monday to Wednesday, 12 p.m. or 1 p.m.
- LinkedIn: For B2B brands, post Wednesday, 7:45 a.m., 10:45 a.m., 12:45 p.m., or 5:45 p.m. EST. For B2C brands, post Monday or Wednesday, 7:45 a.m., 10:45 a.m., 12:45 p.m., and 5:45 p.m. EST.
For Instagram, we conducted a separate analysis of nearly 260,000 posts to determine the best Instagram posting times for each industry:
- Travel & Tourism: Friday, 9 a.m. to 1 p.m.
- Media & Entertainment: Tuesday and Thursday, 12 to 3 p.m.
- Food & Beverage: Friday, 12 p.m.
- Retail: Tuesday, Thursday, and Friday, 12 p.m.
- Professional Services: Tuesday, Wednesday, and Friday, 9 a.m. or 10 a.m.
- Non-profit: Tuesday, 10 a.m. or 4 p.m.
- Non-retail E-commerce: Thursday, 4 p.m. or 9 p.m.
- Pharma & Healthcare: Wednesday and Sunday, 9 a.m.
- Personal Care: Thursday and Friday, 1 p.m., 2 p.m., or 3 p.m.
- Technology: Monday and Tuesday, 2 p.m.
- Education: Thursday, 4 p.m. or 5 p.m.
Remember that these times are just guidelines. You should tailor your posting schedule so that your posts are most likely to reach your audience when they are online.
5. Determine your content mix
Deciding what kind of content to post is a key part of building your social media posting schedule. This is called your content mix. There are a couple of standard content mixes you can use to get started:
1. The social media rule of thirds
In this standard content mix, you divide your schedule among three types of posts:
- One-third of your posts promote your business or drive conversions.
- One-third of your posts share curated content from industry thought leaders.
- One-third of your social posts involve personal interaction with your followers.
2. The 80-20 rule
This mix takes a slightly different approach. But like the rule of thirds it specifies that only a minority of your posts should directly promote your brand.
- 80 percent of your posts are designed to inform, educate, or entertain
- 20 percent of your posts directly promote your business or drive conversions
Social media schedule template
Now that you’ve determined what, when, and how often to post, it’s time to get your social posting schedule down on paper (figuratively speaking).
We’ve created a social media schedule template in Google Sheets that you can use to plan out your social posts for the top networks week by week. In the next section we walk you through how to use the template to plan your social media schedule.
How to use the social media posting schedule template
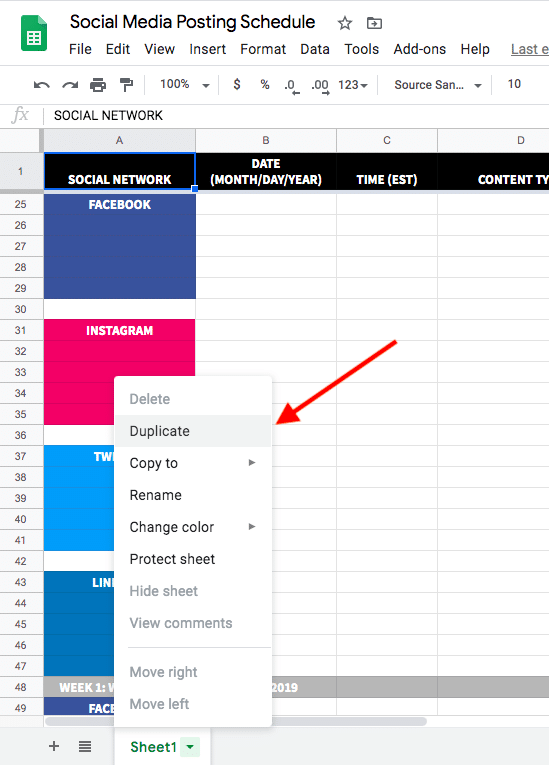
The social media posting schedule template is set up as a weekly schedule of posts for each social network. There’s just one tab in the template, representing one month (divided into four weeks).
To use the template, start by clicking the blue box below…
Bonus: Download a free, customizable social media schedule template to easily plan and organize all your posts in advance.
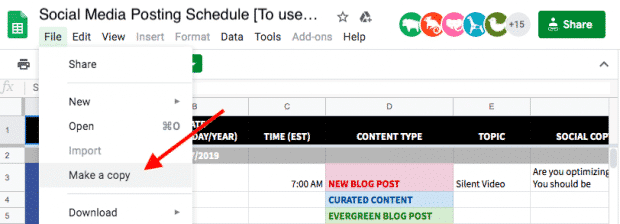
Once you have the read-only document open, click File in the top menu, then select Make a Copy for a customizable version of your own.
In the template you’ll see that each week is divided into Monday to Friday. If it makes sense for your business to post on weekends, copy and paste one of the other daily sections to create space for Saturday and Sunday. Remember, one of the benefits of using a social media scheduler is that you can schedule posts for times when you’re not at work.
Then, make copies of the tab for each month of the year.
Use the post categories in the schedule template to make sure you schedule a good mix of content across your social media platforms. And be sure to follow the 80-20 rule or the Rule of Thirds.
Once you’ve planned out your content in the social media schedule template, it’s time to start creating and scheduling your posts with a social media posting schedule app.
Free social media scheduler
Some social networks allow you to schedule social media posts directly within the platform. (But not all. We’re looking at you, Instagram.) However, it’s time-consuming to open each network, create posts one-by-one, and schedule them for a later date.
Scheduling posts individually on each network also makes it difficult to get an overall view of your social media posting schedule. A social media scheduling platform with a calendar view option makes this task much easier.
We might be biased, but we think Hootsuite is the best social media scheduler. The free social media scheduling tools within Hootsuite give you full control over your social media posting schedule. They also allow you to see your posts for all social networks clearly laid out in one place.
The intuitive calendar view gives you a full picture of all your social activity each week. This lets you check for overlap, and identify any gaps in your posting plan. Here’s a quick video overview of how scheduling works in Hootsuite’s post composing tool.
We show you exactly how to work with Hootsuite’s social media scheduling tools in the next section of this post.
Hootsuite also offers tools to help manage your social media posting schedule on the go. For example, you can manage your scheduled social media posts for your mobile device using the Hootsuite app.
And, to help fill out your social media schedule with curated content, the Hootlet Chrome extension allows you to create scheduled posts from relevant content you find while surfing the web.
Bonus: Download a free, customizable social media schedule template to easily plan and organize all your posts in advance.
How to schedule social media posts
With Hootsuite, you can choose to schedule individual posts, or to upload a file with multiple scheduled posts at the same time.
How to schedule social media posts one at a time
Using the Hootsuite composer, you can schedule social media posts for all of your social platforms (including Instagram) in one place. You can also use the composer to schedule ads on Facebook and LinkedIn.
Here’s how to do it.
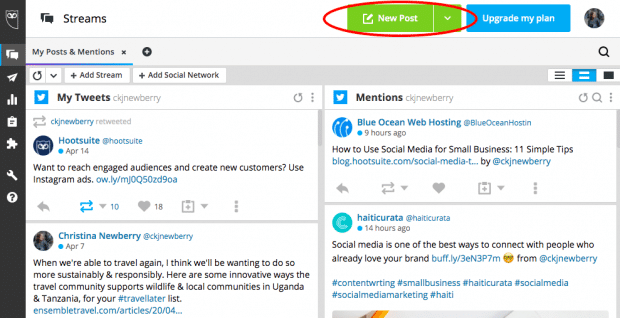
Step 1: From the Hootsuite dashboard, click New Post.
Step 2: Select the social network you want to post to.
Step 3: Compose your message and check the preview on the right side of the screen to make sure it looks great.
Step 4: Click Schedule for Later and select your chosen publishing date and time. You can also let Hootsuite choose the best time for your post to publish by selecting AutoSchedule.
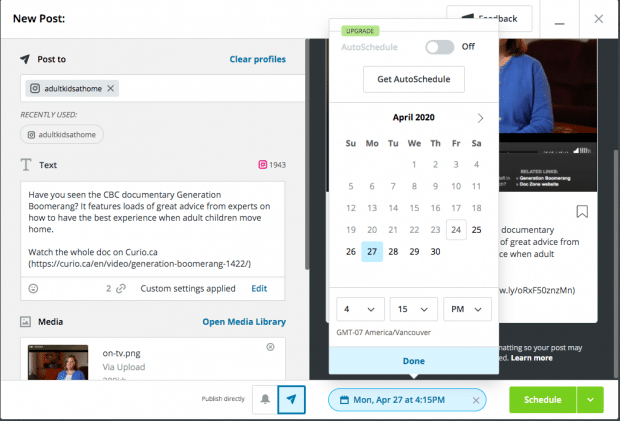
Step 5: Click Done.
That’s it! Your post is scheduled for the date and time you selected.
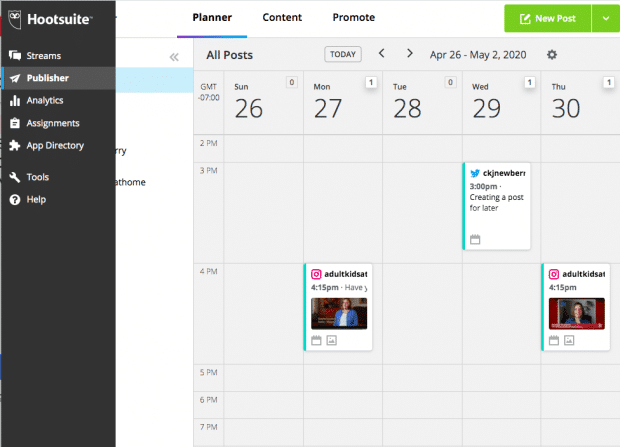
To view all your scheduled posts, click the paper airplane icon to open the Hootsuite Planner. You can then review the posts you have scheduled. To adjust your social media posting schedule, simply drag and drop individual posts.
How to schedule social media posts in bulk
With the Hootsuite bulk message scheduler, you can schedule up to 350 social media posts at the same time.
Here’s how.
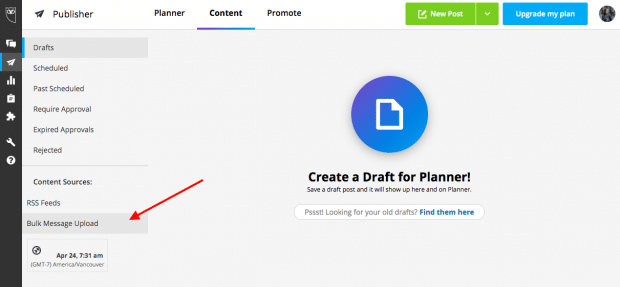
Step 1: From the Hootsuite dashboard, click the paper airplane icon to open the Publisher tab.
Step 2: Click Content in the top menu, then click Bulk Message Upload in the left menu.
Step 3: On the right side of the screen, click Download example to access a CSV social media posting schedule template to make sure you input your scheduled posts in the right format.
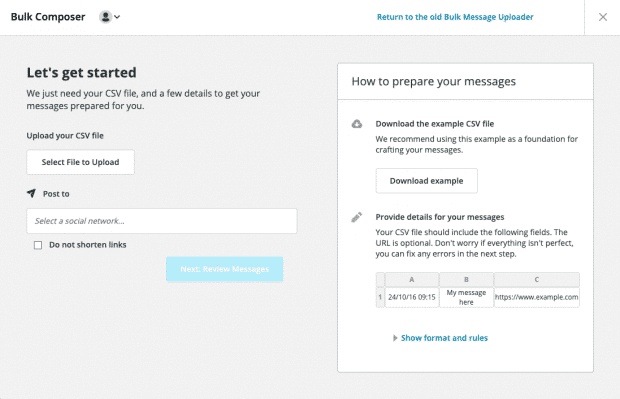
Step 4: Open the CSV file in Google Sheets or another spreadsheet program, and enter the information for your social media posts. For each post you will enter the date and time, the content of the social post, and a link (if desired). Make sure to follow the correct format when entering your information.
Step 5: Return to the bulk message scheduler within Hootsuite. Select the CSV file with your scheduled posts, select the corresponding social networks, and indicate which date format you used. Then click Review Messages.
Step 6: If there are any errors in your CSV file, you will receive a notification. You’ll need to either fix the mistake or delete the relevant post. Once your file is error-free, take this chance to review your posts, and then click Schedule All Messages.
After a few moments, you can open Planner to see all of your posts laid out in calendar format. You can then make individual adjustments as needed.
For more detailed instructions on scheduling your social media posts in bulk, check out our full blog post on how to use the bulk composer social media scheduling platform, or watch this detailed video:
Use Hootsuite to easily schedule posts in advance on every network. Also… engage followers, track relevant conversations and accounts, measure performance, and much more. Try it free today.
